Hello, the world of QA automation! Newcomers are usually intimidated by end-to-end testing, but Playwright – a modern framework from Microsoft – simplifies browser automation. This tutorial tells what Playwright is, how to install it, and guides you through writing and running your first automated test. At the end, you’ll have a simple Playwright test running, and the courage to learn more about advanced web testing by yourself. (Easy, step-by-step instructions, no test automation experience required.)
What Is Playwright Testing?
Playwright is an open-source library (and framework) for test automation of end-to-end web testing developed by Microsoft. It enables QA engineers to automate real user interactions in a browser and simulate clicks, form entries, and so on for web apps.
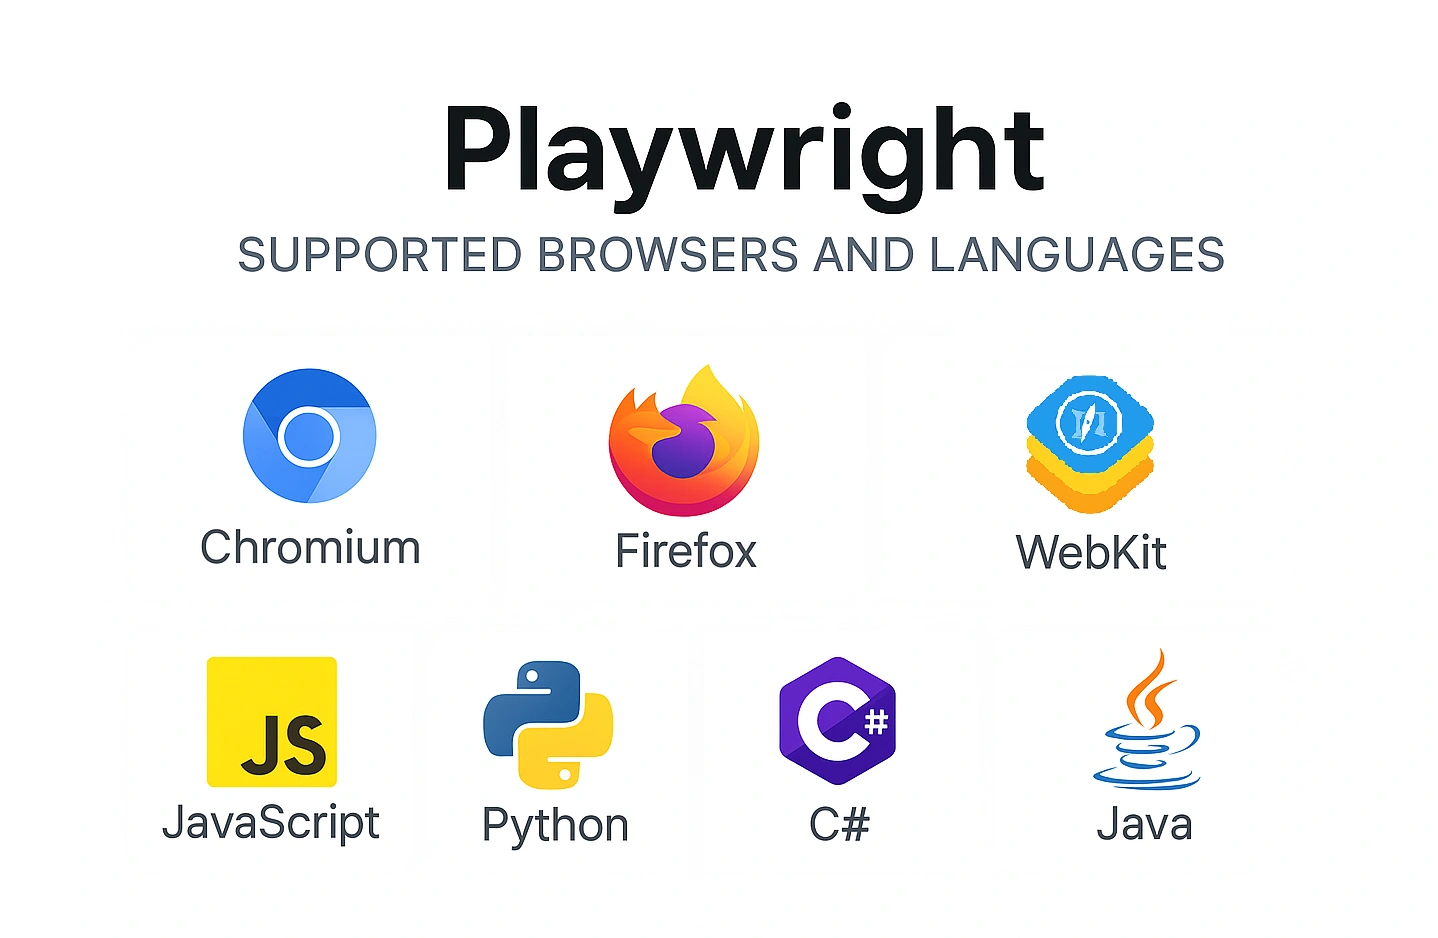
It works with all the modern browsers – Chromium (Chrome, Edge), Firefox, and WebKit (Safari) – with a single API. This implies that you can do cross-browser testing with the use of a single tool, and your web application will work on various browsers and platforms.
Playwright is cross-platform and supports Windows, macOS, and Linux, which means that you can run tests on any OS. It’s also multi-language: JavaScript/TypeScript, Python, C#/.NET, and Java are languages in which you can write tests. This flexibility makes Playwright available to teams of different programming skills.
Tests in Playwright are known to be quick and efficient. The framework has smart waiting (it waits automatically for elements to be ready) and this minimizes flaky tests. You can perform tests headlessly (without a visible browser UI) or headed, capture screenshots, record videos, and even make use of tracing for debugging – all out of the box.
Fun fact: Playwright was developed in 2020 by the same team that developed Google’s Puppeteer. They extended it to cover all the browser engines and made Playwright a powerful next-gen tool for UI automation.
Why Choose Playwright for Automated Testing?
- Cross-browser & cross-platform: Playwright has inbuilt support for all the major browsers and runs on all the major OS. You do not have to have different drivers (e.g., Selenium WebDriver) for each browser – one framework supports Chrome, Edge, Firefox, Safari on Windows, Mac, and Linux. This simplifies cross-browser testing and setup of environment.
- Fast and less flaky tests: Due to automatic waiting and a contemporary architecture, Playwright tests are more likely to be faster and more stable. The framework delays elements before actions, thus, eliminating timing issues. This translates to less flaky tests and more consistent test runs as compared to some of the older tools.
- Multiple language support: Playwright does not limit itself to a single language – you can use JavaScript/TypeScript, Python, C#, or Java. Teams can use a language they are comfortable with. (For instance, a QA team that is good with Python can write Playwright tests in Python whereas a dev team may prefer TypeScript).
- Parallel testing made easy: The Playwright test runner is able to run tests in parallel threads/processes by default. You can run many test cases at the same time, which will significantly increase the speed of your test suite execution. This is excellent for being incorporated into CI/CD pipelines – your end-to-end tests won’t slow down your build.
- Rich tooling and features: Playwright has powerful debugging tools such as the Playwright Inspector (which lets you step through actions), and a code generator (npx playwright codegen) that records your actions and gives you test code – very helpful for newbies. It also includes an HTML test report generator, screenshots on failure, network request interception, and other advanced features, which means you will have a complete testing arsenal at your disposal from the get-go.
Playwright vs. Selenium vs. Cypress (Brief Comparison)
| Feature | Playwright | Selenium | Cypress |
|---|---|---|---|
| Browser support | ✅ Chromium, Firefox, WebKit | ✅ All major (via WebDriver) | ⚠️ Mainly Chromium |
| Languages | JS, Python, Java, C# (multilingual) | Java, Python, C#, JS, Ruby | JS only |
| Execution | ✅ Parallel built-in | ⚠️ Needs setup (Grid/TestNG) | ❌ Limited |
| Setup simplicity | ✅ One-liner install & run | ⚠️ Needs drivers, grid | ✅ Simple |
| Smart waiting | ✅ Built-in auto-wait | ❌ Manual waits | ✅ Built-in |
| Recorder / Codegen | ✅ Yes (codegen) | ❌ No native recorder | ⚠️ Pro feature |
| Headless mode | ✅ All browsers | ✅ Supported | ✅ Supported |
| Network control | ✅ Full API support | ⚠️ Verbose setup | ✅ Built-in |
| Desktop automation | ⚠️ Limited | ✅ Possible | ❌ Not supported |
| AI integrations | ✅ Early adoption (AI testing, trace) | ❌ None | ⚠️ Snapshot-based |
| Best for | Modern web apps, CI/CD, fast feedback | Enterprise & legacy support | JS-heavy front-end apps |
- Playwright vs. Selenium: Selenium WebDriver is a classic in the web automation and has a lot of language support but it needs browser specific drivers and standalone server (or grid) which makes it complex. Playwright, on the other hand, does not need a separate WebDriver process – it controls browsers with its API directly. This results in a faster test startup and less moving parts. Selenium tests may be flaky because of manual waits, but Playwright’s auto-waiting can ensure that the tests are less flaky.
- Playwright vs. Cypress: Cypress is another modern testing tool that is popular. However, Cypress is run within the browser and only supports JavaScript (but with emphasis on the Chrome-family browsers (though it has support for others)). Playwright works externally (which means that it can manage several browsers and tabs simultaneously) and has support for several languages. In practice, Playwright is better for cross-browser coverage, but Cypress provides a rich in-browser developer experience but only for the front-end stack.
How to Install Playwright (Step-by-Step)
Setting up Playwright is straightforward. We’ll show how to do it using Node.js (JavaScript/TypeScript), which is the most common case for newbies. (Playwright can also be used with Python, C#, or Java – those have the same steps using pip, NuGet, Maven, etc.)
Prerequisite: Make sure that you have Node.js installed (Playwright requires Node v14+). In addition, have a code editor like VS Code at hand.
- Initialize a project: Make a new folder for your tests (for instance, playwright-demo). Open a terminal in that folder and type in npm init -y to create a package.json (this creates a basic Node.js project).
- Install Playwright: In the terminal, type in: npm install –save-dev @playwright/test. This installs the Playwright test runner (and Playwright core) as a dev dependency of your project. (This one package contains all that you need to begin writing tests).
- Download browsers: After installation, retrieve the browser binaries that are used by Playwright. Run npx playwright install, this will install Chromium, Firefox, and WebKit engines to your machine. (This step makes sure that all browsers are accessible for testing). It is only needed to be done once.
- Verify setup (optional): You can run npx playwright test – help to check whether the Playwright test runner is known. Playwright also gives example tests if you run npx playwright init, but in this guide we’ll create our own test from scratch.
Installing via Visual Studio Code (Alternative)
Using VS Code Extension: If you want to use a more graphical setup, you can use the official Playwright VS Code extension:
- Open up VS Code’s Extensions marketplace.
- Install “Playwright Test for VSCode” (by Microsoft).
- Press Ctrl+Shift+P.
- Run the command “> Playwright. Install Playwright”.
The extension will require you to choose browsers (pick Chromium, Firefox, WebKit) and install Playwright in your project automatically, including the generation of example test files. This one-click approach is convenient for the beginners and ensures that everything is set up correctly without having to type in commands manually.
Writing and Running Your First Playwright Test
Now that Playwright is installed, let us write a simple test and run it. We’ll use a basic example: verifying that a demo web page’s title has a certain text.
- Create a test file: In your project (e.g., the
playwright-demofolder), create a new file under atestsdirectory, saytests/example.spec.js(if using JavaScript) or.ts(TypeScript). Inside this file, import Playwright’s testing functions: for example, addconst { test, expect } = require('@playwright/test');at the top (or theimportequivalent in TypeScript). This gives you thetestfunction to define tests andexpectassertions for verifications. - Write a basic test script: Write a test in the Playwright test syntax which opens a web page and verifies something. For instance:
test(‘Homepage has correct title’, async ({ page }) => {
await page.goto(‘https://example.com’); // navigate to the website
await expect(page).toHaveTitle(/Example Domain/); // assertion: title contains “Example Domain”
});
This test navigates to example.com and verifies the page title contains the expected text. Playwright’s page object represents the browser page. We use page.goto() to open a URL and expect(…).toHaveTitle() to assert the title. You can add more steps (click buttons, fill forms, etc.) in the same test or additional test(…) blocks for other scenarios.
- Run the test: Save the test file and go back to your terminal. Run the Playwright test runner using the command: npx playwright test. Playwright will start the browsers (headless by default) and run any tests it finds (by default, it will look for files in the tests folder). You should see something in the terminal that says it picked up your test and whether it passed or failed. For our example, you will get a result that shows that the test has been successful. If you want to watch the browser as the test is being executed, you can set headless: false in Playwright config or run with npx playwright test – headed to open a real browser window.
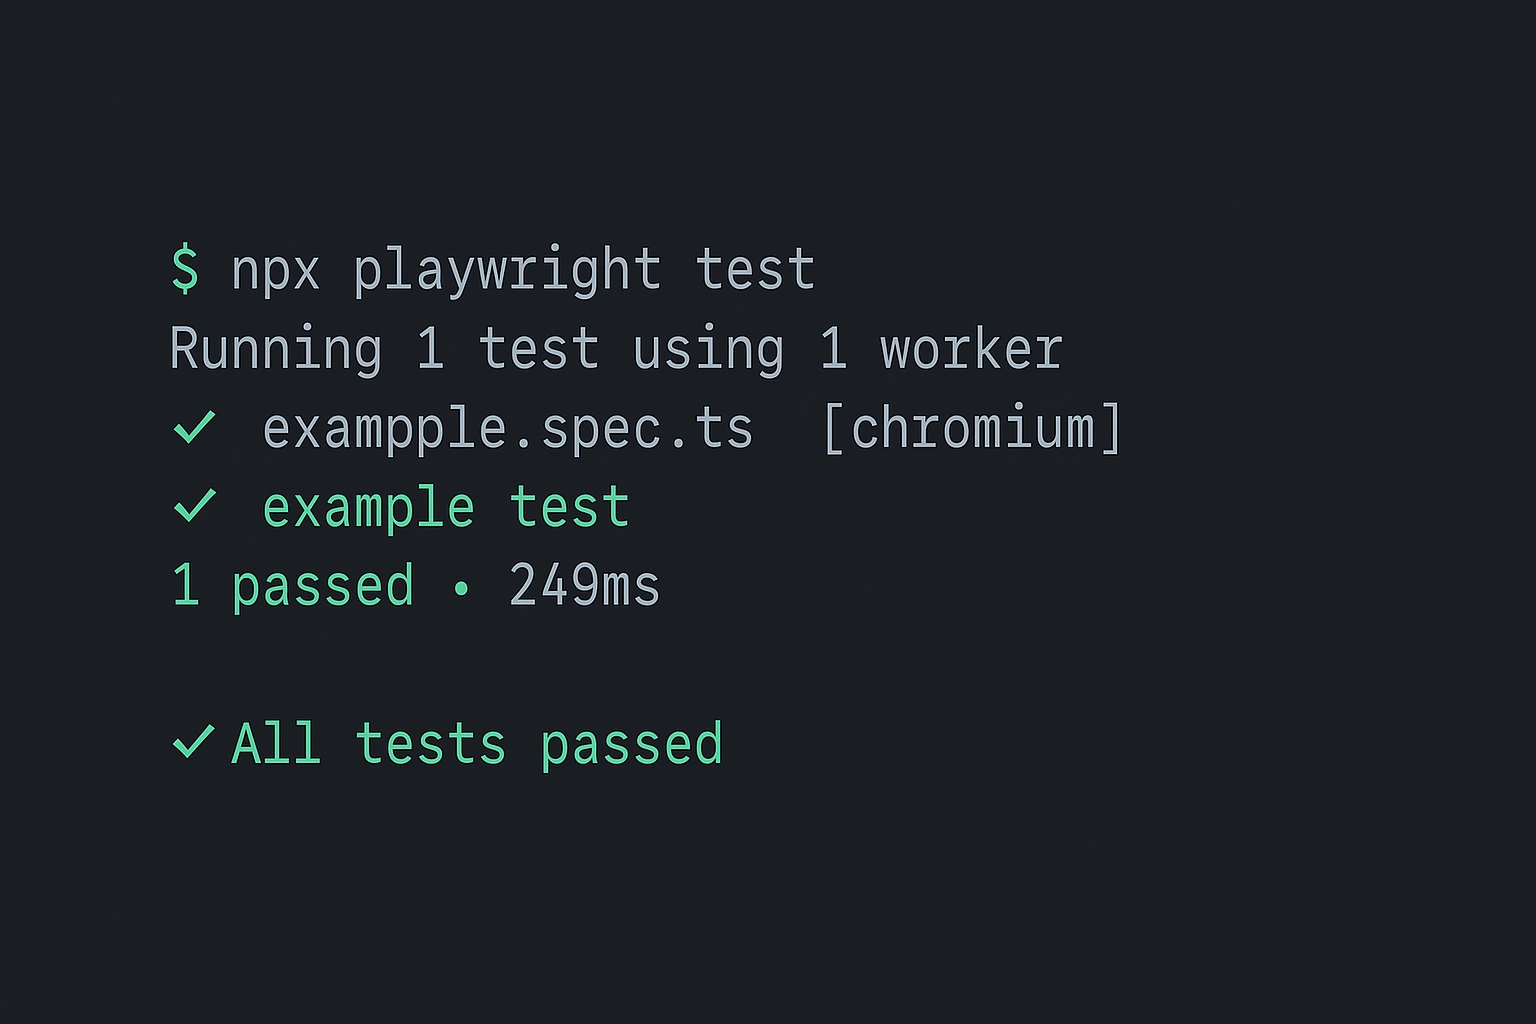
- Result: Playwright will print a summary following running, e.g., “1 passed, 0 failed” with the test duration. It also produces a report (by default an HTML report that you can open to view it in detail). If the test failed, the output will contain the error and stack trace and Playwright would take a screenshot of the failure for you to see.
Playwright Testing Best Practices & Tips
- Start simple and build up: Start with simple tests (such as checking page title or a simple button click) to get to know Playwright. Make sure that every test case is independent – tests should not depend on each other’s state. This allows to run tests in isolation or in any order (very important when running tests in parallel).
- Use robust selectors: Playwright provides potent means to find elements (CSS selectors, text selectors, role selectors for accessibility, etc.). Use the most stable selectors available – e.g., consider adding data-testids in your app or use text/role queries that are less likely to change. This will make your tests less fragile with regards to UI changes.
- Leverage Playwright’s tools: Use built-in tools for the authoring and debugging of tests. Use run npx playwright codegen <URL> to open a browser and record your actions – the tool will generate code for you, which you can copy into your test (great for learning the syntax or quickly getting the selectors for elements). Also use Playwright Inspector by running tests with
DEBUG=pw:*,pw:api npx playwright test --headedor simply adding--debug; this allows you to walk through your test and examine the state of the page at each step, which makes debugging a breeze. - Run tests in parallel, on CI: Once you have a suite of tests, you can make Playwright run them in parallel (it does it by default for multiple files) to make the execution faster. Ensure that your tests do not interfere with each other (e.g., use a new page or context for each test, which is done by default in Playwright). Include your Playwright tests into your CI/CD pipeline (for instance, GitHub Actions, GitLab CI, Jenkins, etc.) and have tests run on every commit or pull request. Playwright’s headless mode is ideal for CI and you can create artifacts such as screenshots and HTML report for each run.
- Use a test management tool for big projects: Once your automated test suite increases in size, test organization and tracking becomes important. Think about using a test management platform (such as Testomat.io) to maintain a high-level overview of your test cases and results. These tools allow you to map automated tests to test cases, monitor execution history, and work in a team on testing. For example, with Testomat.io you can sync your Playwright test results to know which test cases are passing or failing at a time, and this will assist your team to quickly determine the problem areas. (This is optional for beginners, but it is a good practice when you scale up your QA process.)
- Keep learning and exploring: Playwright is a great framework – it allows doing things such as API testing, visual testing, component testing, etc. Keep on being curious and test advanced features gradually. The official documentation and forums about playwright automation are great resources when you are ready to dive in.
Conclusion and Next Steps
Congratulations! You’ve got the basics of Playwright testing – from installing the framework to your first automated browser test. At this stage, you have a working setup and a simple test script and this is a good starting point for further investigations.
As the next steps, attempt to write more tests for various scenarios in your web application. clicking buttons, filling forms, asserting UI changes and so on. You can also play around with testing on different browsers (Playwright makes it trivial to run the same test on Chrome, Firefox, and Safari) and run tests in parallel to save time.
When you are comfortable, explore Playwright’s richer capabilities. use the Playwright Trace Viewer to debug test runs visually, integrate with frameworks such as Jest or test runners of other languages if necessary, or connect your tests with continuous integration to make them run automatically. Every new test that you write will develop your skills and confidence in QA automation.
Keep on practicing and enjoy it – Playwright’s aim is to make automated testing easy. With the information from this beginner’s tutorial, you are already in a good position to write strong end-to-end tests for your projects. Happy testing!
(And keep in mind that the testing community and such tools as documentation or Testomat.io are there to help you when you are scaling up your Playwright test suite.)